


The R.E.P.O. monsters are savage to those bravely facing their taxes alone. You get warned of the dangers that lurk beyond the unwelcoming entrance by the Taxman, who’s crying tears of joy as it enjoys seeing you struggle.
R.E.P.O. is incredibly unforgiving to new explorers. Without any weapons to fight back and a painfully short stamina bar, panic is an inevitability. To make matters worse, some valuables you pick up can hugely impact your game—and not in a positive way. Not only do you have to transfer goods onto the extraction point, but some items like the Music Box actively try to ruin your run (as it makes you continuously spin when you have the box in hand).
So, if you’re looking for a bestiary and some survival tips, here is how to deal with all R.E.P.O. monsters.
This article in a work in progress.
All monsters and how to evade them in R.E.P.O.
I’m uncertain how many monsters reside within R.E.P.O. Unlike Lethal Company, which has a bestiary you can refer to, you have to get close to R.E.P.O‘s monsters to get their name. I got Energy Crystals to collect—I’m not trying to get my head torn off, introducing myself to giant heads, laser beams, and duckies. We’re collecting data as I type this, accumulating official monster names, and developing survival strategies to manage R.E.P.O.‘s monsters.
We speculate monsters spawn in together and at the furthest position away from the first extraction point. We’ve found only two monster types spawn in on level one and two.
Some monsters don’t hurt you or deal minimal damage. They, instead, are there to jumpscare you or alert other, more lethal monsters to your whereabouts. At the time of writing, we’ve found that monsters (although randomly generated) seem to have a set spawn to particular locations (levels). We will add the level you can find each monster in as we conduct more research.
Here is every monster we’ve discovered: their threat level, how to avoid, and what they do. Some entries have their official name, others have a placeholder (indicated by an asterisk) until we can confirm their identity by shaking their hand (and getting it bit off in return).
Look at the chat inside the truck for the Taxman’s message when you enter a location. It can hint at one type of enemy that spawns (mostly the Headman).
So far, we have taken 14 screenshots and identified 11 monsters, but I’ve already seen and experienced new, albeit brief, encounters that have mostly jumpscared rather than attempted to kill me. They’re a bit camera-shy, but I will capture them all—eventually.
Spewer
- Threat: Low
- Maps: Witch Academy and Manor
Monster summary
The Spewer is a tadpole-looking monster that flies around. It spits acid from its mouth and has two main functions: Spew acid at you or latch onto your neck. If it does the latter, its tail coils around your neck, and the Spewer starts continuously throwing out bile. This doesn’t impact you, however. It’s your teammates who are in the danger zone.
Survival strategies
Keep back to avoid taking damage. It doesn’t fly particularly fast, nor does it have good vision to spot you under furniture or crouched. If it wraps itself around you, make sure your teammates do not attempt to take it off, otherwise they’re at risk of taking damage from its bile. The Spewer will eventually fall of,f and you won’t have taken any damage.
Trudge
- Threat: Low
- Maps: Witch Academy and Station
Monster summary
Surprisingly, Trudge isn’t much of a threat. It moves around the map incredibly slowly, waiting for you to stand before it so it can use its bent neck to swing and hit you. The Trudge can easily one-shot you if you’re careless.
Survival strategies
This entity is incredibly easy to avoid. Just move into another room and continue exploring, looking for valuables while remembering where you last saw him. Refer to the map in case you get lost. So long as you stay on the side of him where his bent neck isn’t looking, you can actually crouch-walk beside him. Use furniture to get around him and remain crouched to avoid alerting him to your position.
Cloak*
- Threat: High
- Maps: Manor and Academy
Monster summary
The Cloak isn’t much of a threat if you see the back of it. It’s only when it turns around that your life becomes threatened. The Cloak resembles No-Face from Spirited Away as its body consists of a single black cloak with a white skull-like head and hands at the bottom. It will charge at you if you’re spotted. It will one-shot you if you’re caught out.
Survival strategies
Stay behind the Cloak at all times and move into another room as soon as possible to avoid alerting this entity to your location.
Gnome
- Threat: Low
- Maps: Manor and Station
Monster summary
The Gnome acts similarly to the Apex Predator in that it follows you around. It’s quite persistent and a nuisance to deal with, as it attacks you if you get too close. The problem is handling this entity while another, larger threat is after you. It will deal minimal but consistent damage that puts you in a vulnerable position. They can also spawn in groups.
Survival strategies
Pick them up and drop them; this will kill them instantly. Even if a gang of them is grouping up on you, pick one up, lift to a height, and drop onto another Gnome to kill both.
Headman
- Threat: High
- Maps: Manor and Station
Monster summary
This is exactly what it sounds like—a giant floating head. The Headman is one of the hardest monsters to run away from as it’s incredibly persistent once it notices you. Its attacking phase is evident by its widened eyes and open mouth, where it will lunge and bite you if it gets close. A single bite takes off 50HP.
Survival strategies
Stay behind the Headman whenever you can. Use furniture to hide from him. If spotted, run to a corridor that has an alcove or a side room, shutting the door behind you. While he can open doors, he will lose track of you if you’re quick enough. Never run away in a straight line.
Hiding under furniture doesn’t help if the monster sees you.
Reaper
- Threat: Medium
- Maps: Station
Monster summary
The Reaper is a dual-wielding scarecrow that waddles around the map. Like most R.E.P.O. monsters, the Reaper can open doors. This makes it somewhat hard to detect as it’s stealthy and quiet. It moves slowly until it notices you. That’s when it winds up its blades and starts swinging them around. It will chase you, trying to catch you with its weapons.
Survival strategies
Hide under furniture and remain crouched, keeping to the side if a Reaper appears. It doesn’t chase for long, and we believe it has a similar short, aggressive phase to the Apex Predator. The Reaper struggles to chase players and instead only punishes the oblivious players it’s snuck up on. Shut doors behind you as you’re running away; this should reset the Reaper, as it’ll forget about your existence. Stamina and speed are a must against him, as running away in a long corridor will likely get you killed if you’re unprepared.
Ceiling Eye
Monster summary
The Ceiling Eye deals minimal damage, taking two health points every few seconds. This only happens if you’re caught in its gaze. The Eye will pull you in, forcing you to look at it. While it doesn’t hurt much (it takes two HP every few seconds), it does distract you long enough to accidently walk into a deadlier monster. The Eye will move on but will eventually respawn in the same spot if you stay on the level long enough.
Survival strategies
Leave the room as soon as you see this Eye. Don’t stay a moment longer. Yes, your vision will get pulled, but so long as you’re close to an exit, you can pull yourself away. The Eye’s gaze only works within the room it spawns in.
Apex Predator
- Threat: Low to medium
- Maps: Manor, Station, and Academy
Monster summary
The Apex Predator is an adorable arsehole. This little guy will seem innocent at first, but he has an aggressive side. We hope you never see it. The duck follows you around the map, waddling and dancing, it’s almost hynotizing. He’s inviting you to pick it up, but trust your instincts and ignore that itch for curiosity, for it’ll only get you killed. If you in any way touch the duck, its mouth will split open, showcasing rows of endless teeth, ready to snap you in half. He flies into the air and starts chasing you, but this phase lasts around 10 seconds.
Survival strategies
The duck will do everything in its power to make you grab him. It follows your crosshair, jumps into the cart when you’re placing items inside, and will quickly become your ride or die—all in its persistent attempt to make you hold him. Honestly, the best thing to do is ignore this guy. Pretend he doesn’t exist. It’s difficult when he makes his presence known every moment, but do your very best moving your crosshair away from him. Beware that if he takes any damage, be it from your own hand or an object, he will transform and attack.
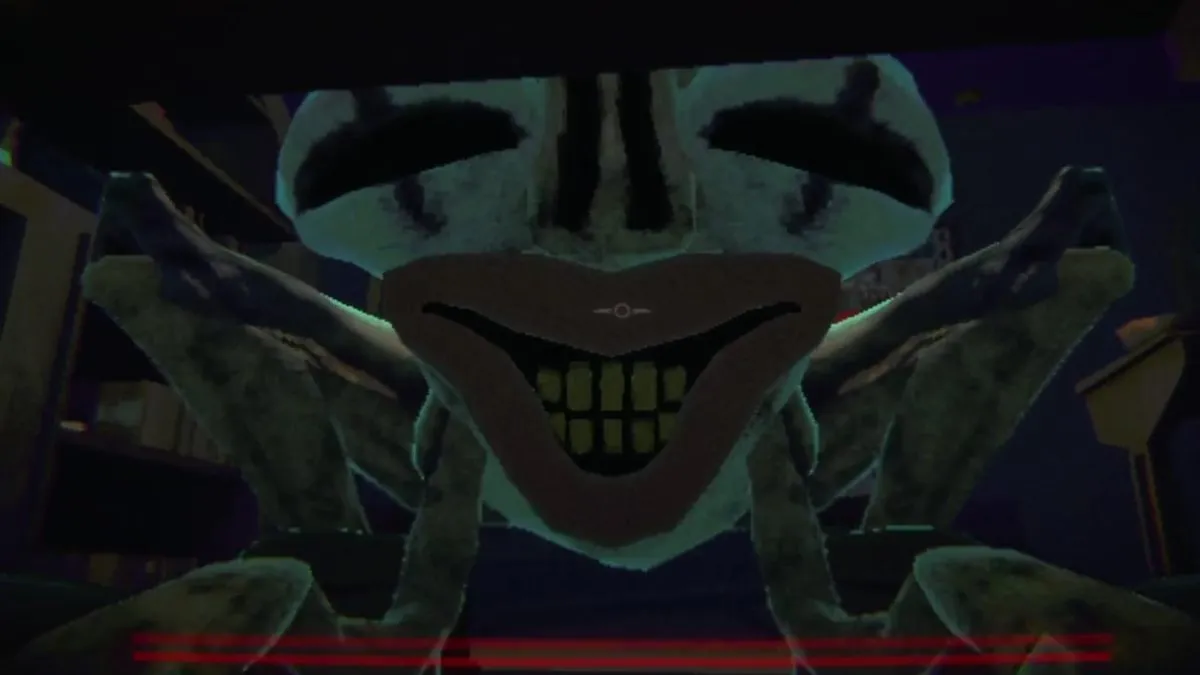
Clown
- Threat: Medium
- Maps: Academy
Monster summary
The Clown is absolutely brutal if you find yourself trapped at the spawn with this thing ahead of you. It’s identifiable by its giant eyes and a mouth resting at the center of its body, but this isn’t where the threat lies. It’s on the top of its red nose that a giant beam can form once it notices you. The laser builds until it shoots out a single beam, moving across the ground horizontally. Anything in its path will get annihilated. The Clown also has close-range attacks, which include a stomping animation.
Survival strategies
The Clown is easy to avoid if you’re constantly moving around the map. It’s not particularly quick, but if you’re caught out inside the extraction point or fail to notice it open the door behind you, then it’s game over for you. As it has a long wind-up time, use it to your advantage to leave the room you’re in and move away from the door. This way, you won’t die to the beam as it cannot shoot through walls. Crouch and hide under furniture when you’re in the same room as him; he won’t see you.
Huntsman
- Threat: Medium
- Maps: Academy and Station
Monster summary
The Huntsman is a shotgun-wielding enemy that resembles Lethal Company‘s Nutcracker. Unlike his long-lost cousin, however, this hunter has good vision, making it difficult to get around him. He sticks to a particular patrolling path, so you will likely run into him when moving valuables to the extraction point.
Survival strategies
His shotgun can kill you if you get caught out, so be sure to run if he sees you. Shut doors behind you and get underneath furniture. We don’t recommend running around if the Huntsman spawns in unless you’re trying to escape because he’s spotted you. Create distance and refrain from running in a straight line to reduce the chances of being hit by the shotgun spread.
Upscream
- Threat: Medium
- Maps: Station
Monster summary
This creepy guy is incredibly persistent if he spots you. He only has one mode of attack, which flings you up into the air, throwing you against walls that deal 10 damage points every time he successfully gets the attack off. They’re fast and punish anyone with low stamina.
Survival strategies
The Upscream is surprisingly difficult to get around. They often appear in pairs and have excellent vision. It’s best to use cover and crouch to avoid being seen. Hiding under furniture won’t get you far as these monsters will have a direct line of sight to you. Climbing on top of structures doesn’t help you against these, either, as they can leap up and lock onto you. This is definitely one of those creatures you need to kill.
Spider*
- Threat: High
- Maps: Station
Monster summary
The Spiders remind me of something I made as a kid on Bamzooki; janky, moving humanoid creatures that move much like a spider. Their attack deals four damage points, but they’re not super quick, so they won’t overwhelm you. However, having multiple attacks on you at once can quickly result in your demise.
Survival strategies
Use cover to break the Spider’s line of sight. The Apex Predator, if activated, can kill Spiders. Just make sure you don’t stick around long enough to become his next target. Weapons are best here.
Shadow Child
- Threat: Low
- Maps: Station
Monster summary
This entity is a tall, thin humanoid creature that mostly stands still. It can only teleport when you’re not looking at it, but this won’t kill you. The Shadow Child can only kill if you look at it for too long. This means it’s only threatening from prolonged exposure. It can teleport and cause your vision to turn dark.
Survival strategies
The Shadow Child behaves like the Enderman in Minecraft. All you need to do to survive is to avoid looking at it. Listen to its laughter, and if the room turns dark for its presence, then make sure you’re not looking towards it. You can walk backwards to pass it or look occasionally at its feet, but never above that. There is room for error against Shadow Child as you’re not killed instantly for looking its way, but you shouldn’t ever feel tempted to keep this entity in your peripheral view. When in doubt—just ignore it.
Poltergeist*
Monster summary
The Poltergeist plagues level four and above lobbies, where his breathing is the only warning you get. This ghost-like entity moves around the map with ease, ready to inhabit anyone wandering in its path. He either stands still, almost catching his breath back as he inhales deeply (indicated by his breath being the only visible thing on screen), or runs towards you. He has no physical form. The Poltergeist chases players with hopes of possessing them. Once possessed, the character shrinks as if they’re crouched and lifts them into the air. You can hear wheezing and laughing when someone is possessed. The Poltergeist’s goal is to bring you to the nearest threat—putting you into the jaws of danger—with no hope of escape.
Survival strategies
Listen for its breathing and keep your eyes peeled, as you can see its breath, regardless of whether it’s moving or standing still. Steer clear of its pathing and always be on the lookout. As there’s no physical form you can see, it’s highly unlikely you can kill this vengeful spirit. We theorize that picking and placing possessed items (such as the screaming doll) activates the Poltergeist.
Read the full article here


